Jazz Guitar for Beginners
Published on 26 January 2016
For more information from the source site of this video please visit:
http://secretguitarteacher.com/youtube/beginner/jazz/saEKt50_b7Y/112564557-jazz-guitar-for-beginners.php
This is a sample video from the Secret GuitarTeacher site (link above).
It is the first lesson from a new course called the Beginners Jazz course.
It is designed for guitarists with little or no experience of playing guitar, but who would prefer to go straight into learning Jazz Guitar rather than taking the more traditional route of playing Blues, Rock, Folk or Classical guitar first.
Here is the abridged transcript:
Welcome to this first lesson in our Beginners’ Jazz Course. Let’s start off by getting you playing some jazz chords.Take a look at this G minor 7th chord.
Place your second finger on the bottom string at the third fret. Now get your third finger to hold down the fourth, third and second strings, also at the third fret like this. Meanwhile with your other hand, place your thumb on the 6th string, your index finger on the 4th string, middle finger on the 3rd string and ring finger on the 2nd string like this and pluck all four strings in one action like this.
Remember, to get a nice clean sound we want to get these strings pressed firmly against the metal of the frets - it’s the contact between string and fret that creates the note - our finger has to press just hard enough to achieve a firm contact.
Don’t worry if in spite of your best efforts the sound is still less than perfect - with practice, your fingers will both strengthen and harden and this will, all on its own, make your chords gradually sound cleaner.
We’ll follow our Gm7 with a C9 chord. I’m hoping you can hear how nicely those two chords sound together.Starting from the Gm7 shape we have just been playing move the second finger across one string to the 5th string at the same fret, the 3rd fret. Now add the first finger on the 4th string at the 2nd fret and the 3rd finger on the 3rd string at the 3rd fret. Finally add the pinky on the 2nd string also at the 3rd fret .
Once you have learned this chord change, practice jumping from one to the other. Just play one beat on each chord like this.
It’s important to spot that the fingers never leave the strings, the movement is just enough to allow the strings to come off the metal frets
This has the effect of muting the sound of the chord and this technique will give your chord playing more rhythmic definition. You can hear the difference.
Once you have got that up to a reasonable speed and feel ready to move on, let’s add one more chord. This is an F6 chord
First finger on the bottom string at the first fret 2nd finger on the 3rd string at the 2nd fret 3rd finger on the 4th string at the 3rd fret and pinky on the 2nd string at the 3rd fret.
For many people this will prove to be too much of a stretch to start with, but in this case I want to encourage you to stick with this shape. I’m going to show you a valuable exercise that you can use with pretty much any chord that you find too much of a stretch when you first try it. It’s uses what I call the ‘Torture Rack principle’
Take any chord shape that you find too much of a stretch and play it as high up the fret board as you can. So I’m going to move my F6 shape right up to the 12th fret here. Adjust your fingers at this position to get the best possible sound from the chord and then simply move it down a fret. Again, make any necessary adjustments to get the fingers nicely behind the frets and get as good a sound as you can then move it down another fret, adjust and move it down again adjust as needed and move it down again…and so on fret by fret, doing your best to get as good a sound as possible at each fret before moving on down.
Until, rather amazingly you find that you have arrived at the first fret, but with a chord that actually sounds great and doesn’t seem as much of a stretch - the evil torture rack has done its work.
Once you are happy enough that you have got these three chords under your belt, try playing them in this sequence. The 4/4 time signature at the beginning of the bar tells you that we are playing four beats to each bar. At the moment we’ll simply pluck once for each beat.
Almost inevitably, to start with, there will be a little interruption in your timing as you shift from one chord to the next maybe something like this..
Notice that we haven’t given the full name of these chords - rather we have simply labelled them as ‘chord types’. Minor seventh, 9th and 6th. This is because these are all what we call movable chords.
Ok, that’s about it for this first lesson. Put in some practice on that exercise and meanwhile, there’s no harm in continuing on to the next lesson where we’ll also get you started on exercises to help your lead playing So, see you in the next lesson.


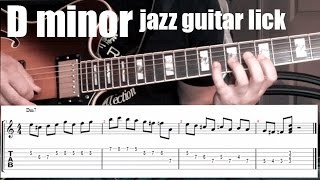 Minor jazz guitar lick | Lesson # 1 | Dorian mode
 Jazz Guitar Lessons with Chuck Loeb - Find out how...
 Steve Herberman - Comping - Ballads and Jazz Waltz
 50 Soul Jazz Licks - #49 - Guitar Lesson - Tom Dem...
 I VI II V - Kurt Rosenwinkel #1 ã€ÂTranscripti...
 AIN'T MISBEHAVIN - Guitar LESSON - Chord Melody Ja...
 How to Play Guitar Like Wes Montgomery - C7(alt) L...
 II V I - Lage Lund #4
 Dix Nacey Jazz Guitar Lesson 37 - Comping on Ornit...
 Wes Montgomery jazz guitar lesson | Lick # 6 | Maj...