The Caged System. Part 2 of 2.
Published on 26 January 2016
For more information from the source site of this video please visit: http://secretguitarteacher.com/youtube/advanced/theory/K7MoHfh0ZvM/83848286-the-CAGED-system-2.php
The CAGED System of Fretboard Orientation (part 2)
Second part of the Secret Guitar Teacher's guide to this effective short-cut to learning where notes are on the guitar fretboard. A different explanation of this popular method for instantly finding notes, scales, chords, arpeggios and modes anywhere on the guitar fretboard, in any key. This two part video is part of a course presented by www.secretguitarteacher.com - quality online guitar lessons backed up by personal support from veteran guitar teacher Nick Minnion
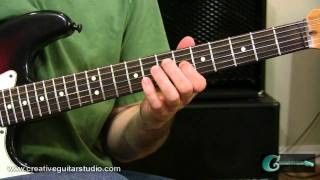
In a minute we'll look at how we can apply this pattern to playing other notes than C.. but before we do that it will help to notice a connection between the CAGED octave pattern shapes and the open string names.
For example, when we start with our first finger on the E string we always play the E Pattern.
When we start with our first finger on the A string we always play the A Pattern.
When we start with our first finger on the D string we always play the D Pattern.
When we start with our first finger on the G string we always play the G Pattern.
BUT When we start with our first finger on the B string we always play the C Pattern.
Why? Well there is no B in the word caged! Also there is no C string. I like to think of C from the CAGED system and B from Open string Names as like the only two single people at a party where
everyone else is paired up -- they just have to get together!
So when you are working with the CAGED system it is best to think of the B string as the C string.
Okay so how do we use this pattern to play other notes? Well there is a nice little routine to follow here that will soon get you used to this..
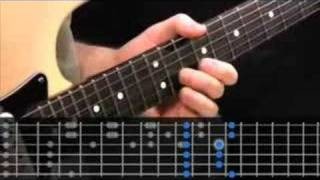
Let's say we want to play all the F#s.
Step 1: We find the F# that is farthest down the fretboard.
Step 2: Ask yourself which string is this note on?Answer E
So this means that we are going to start our pattern with the E shape.
Then ask yourself what comes next after the letter E in the word CAGED?
And move on to that shape. D and continue the pattern from there. If you have drilled this a few times with the C notes your fingers will already be used to the pathway.
OK. Let's try one more example. The Note D.
Step 1: We find the D that is farthest down the fretboard. In this case that is the open string.
Step 2: Ask yourself which string is this note on?
Answer D string. So start the pattern from the D shape. D is at the end of the word CAGED, but we simply start again so C follows D.
Ok. Hope you found that interesting. One problem with teaching the CAGED system is that it is definitely one of those things that prove its value over the long term.
For me, both as a guitarist and a guitar teacher I can now truthfully say that it is right up there on the list of the most important elements of understanding how to play guitar.
With hindsight, I can see that from the day I learnt this system I never looked back in terms of being able to find my way round the fretboard. It is a very powerful tool so I recommend learning to use it as much as possible.
Printout of the detail of the system is available from the toolbox to the right of the screen. Click on Printout Tab.
The CAGED system will help you find any note on the guitar and lays the foundations for being able to find any scale or chord as well.
However to take it to that level there are two more steps required. The next of these is interestingly called the Sandwich exercise. And that is where we are going in the next lesson.
So See you then!


 Understanding Key Signatures - Part 1
 GUITAR THEORY: Along the Neck Scale Patterns
 5 Essential Blues Boxes: Box 5 Preview
 Easy Guitar Lesson - Understand Scale/Chord Relati...
 Diminished Chords - How to Use Them on the Guitar...
 How to Change Chord shapes Quickly
 Outline the chords of the G Major scale in triads.
 Bruce Bouillet: "Alternate picking" (Guitar Lesson...
 Learn Chord Theory In No Time
 Diminished Chords - How to Improvise Over Them - P...